- Remove the center panel between headlights.
- If you have the factory intake installed, remove the 6 or so bolts which hold it in and remove
it from the vehicle. If you have the JWT POP filter or other aftermarket intake installed, you can skip this step, however I find it useful to remove the filter and "T" hose to buy a little extra clearance.
- Look at the headlight assembly and find the two stampings where the inboard most bolts
were inserted through the assembly, reach underneath and loosen these two fastners
with a 12mm socket. The one near the bumper is a nut and can be removed w. a simple 3" extension, the other is a bolt, and I prefer to use a 6" extension w. a universal-jointed 12mm to reach it.
- To remove the 3rd bolt, which is towards corner of the car, first remove the 2 screws which
hold the turn signal assmembly in, pull it out, and unplug its harness so the lamp is
out of the way. This bolt you CAN see, but only if you get on your back and
look up through the opening. I suggest just reaching in and feeling for it, again, it's the
only 12mm fastener in the area, though be careful not to get the body fasteners confused with the headlight fastener (the 12mm socket is too big anyway).
- The last bolt, which is towards the outside and back (near the wheel well) is by far the trickiest to get to but it is still not much of a problem. Start the car (make sure there
isn't anything to get hung in the engine) and turn the steering wheel to the opposite side of where you're working (if you're removing driver's side light, turn wheel right for
example). This will give you easy access to the 3 lower most screws that hold the
wheel well trim on. After removing these three screws, pull the wheel well trim back
until you have enough room to see in. On the driver's side, the remaining bolt which
holds the headlight assembly in is above the coolant bottle. It is impossible to see
so again, you're going to have to feel around for it, and again, it should be the only
12mm fastener in the area. If you have a mechanics mirror, you can try to locate it
using the mirror, or do as I did, and just search for it blindly, if you look at the assembly from above you can get some idea of where it should be located. Again a universal jointed 12mm w. a decent extension bar really helps to get at the last bolt.
- After removing the 4 nuts / bolts, disconnect the low and hi beam connectors, and pull the
headlight assembly straight up and out of the car. The trim ring may hang on the body so you might have to use a flat edged instrument to pry it up and out, be very
careful not to damage it as Nissan's list price is close to $30 each.
Should you want to replace the headlight gaskets due to age or damage now is the time:
- Drivers: 26078-30P00
- Passenger: 26028-30P00
Most sources of Z32 information will tell you that in order to remove the headlight assemblies, the entire bumper cover must be removed from the car. This is not the case.
The procudure :
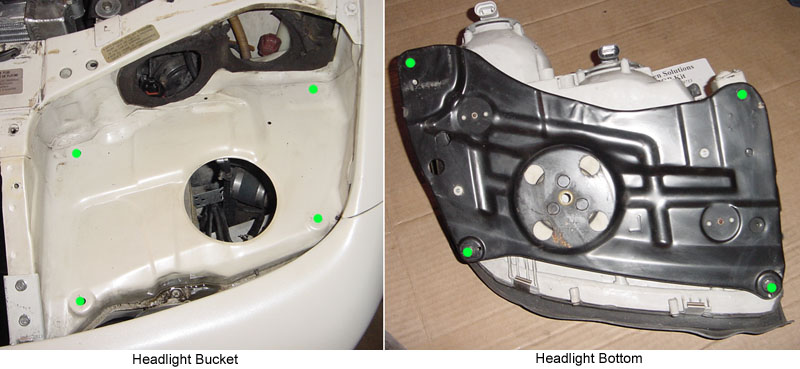
Under side of headlight unit, mounting points indicated in green dots:
While you have the headlight assemblies out, you can remove the bulbs and run a suitable formula of soap, water
and alcohol through them in order to clean the interior of the lens, which as the years pass by, tend to fog or haze even if they're not cracked or the factory seal broken. Someone once suggested running 1 drop of liquid dishwashing soap through them with a lot of water, rinsing repeatedly with water, then running some alcohol through and drying with a hair dryer. This method hasn't been tried personally, but seems like a logical way to do a
thorough cleaning. Use your discretion as to what you use.
Note that installing a headlight with the fascia on and not watching where the studs are going is a good way to damage your paint, pay particular attention to the pair of studs.